
 I wanted to brush up on my chemistry this summer. I thought a good way to do it would be to go though my old organic chemistry text book from two semesters ago. I also thought that it might be fun to splash in some chemistry lessons into my kids summer school. So after searching online I found quite a few experiments but no organized approach to teach chemistry. At least not one I was wild about or wanting to spend money on. So then it hit me. Why don't I go thought my chemistry text book with my kids. The obvious reason not to is that it would be too complicated for them. But who says they have to learn everything in it? I could review and teach them some basics all at once. So I busted out the book and turned to page one.
I looked though it and realized that by skipping the "math", focusing on the chapter intro topics and using the figure examples it would be a really great basic chemistry outline for kids and a great review for myself. Another good reasons to use a textbook is no matter what the kids ask about I will have the answer in front of me with pictures! It is also very cheap. I know text books are known for being expensive but only the most current one's are. As soon as the new editions hit the value of the old books drop dramatically. The same book I paid big bucks for 18 months ago is now $3.50 used here at abebooks.com. I am using the one written by Frost, Deal & Timberlake but I am sure any general chemistry book would work.
The first less is on matter, volume and mass. I am going to try and document my lessons with my kids just in-case someone would want to replicate the course with their own kids. I am also going to really try and use just what I have on hand (and therefor what you may already have on hand) for the lessons. Since it is for young kids it is also going to be all hands on.
 Lesson One: Matter

Materials list
Balloon or gallon plastic bag
Rocks or any small heavy object
Kitchen scale (set to grams preferably)
Pen &Paper
Pen &Paper
Lesson 1 Objective
Explain that everything in the world from the air we breath to the ground we walk on is made up of matter. also...
Matter has both Volume and Mass.
Volume - The amount of space that is taken up by an object or matter.
Mass - The amount of matter in an object measured by weight.
Hands on Experiment:
Have the kids weigh the different sized rocks and write down how much they weigh. Have them put them from smallest to biggest. Blow air in the bag so it is much larger that the rocks. Have the kids weigh the bag and write it down. Now ask which has more volume. (The bag) which has more mass? (the rocks you use should weigh more than the bag of air.) My older daughter wrote on the paper as my son weight the rocks. It may take some time to explain to younger children. They will tend to always pick the bag as it is biggest so it must have the most of anything. Keep having them use the scale to show them that bigger is not necessarily more. If you have more time you can have the kids grab some different sized toys and things to weigh and put them in order of heaviest to lightest and then reorder them in biggest (most volume) to smallest (least volume).
I set the timer for 15 min and when it beeps we clean up. I don't want the kids to get board with one subject, so I do the time limit. There is no reason to have one lesson not take up a few days to practice and let it sink in. Unlike regular school, summer school isn't about getting a curtain amount of material covered, anything you do with the kids is just bonus. We do Math and English every Monday - Thursday and I pepper in Geography, Chemistry, History, Art, Music, Nutrition, Puzzles and Crafts. Just with whatever I have on hand. I only do 3 or 4 things a day with them for about 15 to 20 min each. Friday we have "off". I am hoping it will go well trying to teach both the preschooler and first grader with basically the same material. After today I can see the biggest challenge will be getting Bella to hold in her answers long enough to get Liam to respond to something. While no where near perfect I think it will be still be worth the effort.
Lesson 2: States of Matter
Material List
Ice
Thermometer
Clear Glass Jar or Coffee Pot
Clear Plastic bag
Rubber band
*Stove (obviously be careful when dealing with heat and children)
Lesson 2 Objective
Explain to the children that there is 3 major states of matter and the differences between them.
Solids - particles in a solid are arranged orderly and tightly together they move but only slightly. Solids have visible volume but the shape of a container has no effect on the shape of a solid.
 Liquid - particles in a liquid are close together but move around each other freely. Liquid has visible volume and it's shape will be altered by the shape of it's container however the volume will remain the same.
Gas - particles of a gas are far apart from each other and bounce off each other and the sides of the container. Gas has no visible volume. Gas will fill all the available space of a container it is put in and take up more or less volume based on the size of the container.
Hands on Experiment A
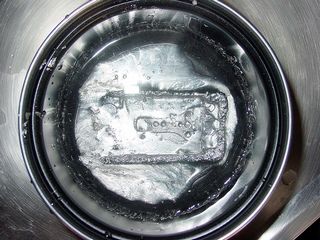
Show them the above picture. Take ice from the freezer and place in your jar. Note that the shape of the Ice did not change. Secure a bag over the top of the cup with ice and remove as much air from the bag as you can. (I pushed the bag down into the jar.) Place the jar on the stove and turn on the heat to a low med. Have the kid watch as the ice melts, note that the liquid is taking on the shape of the glass). When the water begins to boil it will fill the bag with steam (note that the gas is now filling the space available to it). After the bag is full of steam remove from heat and allow the bag to cool. Show the kids the outside from the outside of the bag the water that is returning to room temperature become liquid again. after the glass has cooled to warm rather than hot put it the cup in the freezer. After some hours show the kids that the liquid has returned to a solid state. (Please heat and cool the glass and water slower than faster as thermal shock can break glass.)
Hands on Experiment B
 The state of matter is affected by heat! Explain that all matter has a freezing point and a melting point. These two points determine what state the matter can be found in. It is at different temperature for different things. Have the kids measure the temperature of ice water, room temperature water and then a glass of hot (but not boiling) water with visible steam coming off of it. Explain to the kids that even metal has a melting point. It is just a much higher than the melting point of water. If you would like you can look up the different melting points of things on the internet. Gold silver copper ex. Tell them even things that start out as gas like air and nitrogen can freeze and become solids or liquid. As a bonus and if you have a sub zero in your area you can take the kids to see how liquid nitrogen is used to make ice cream.
Vickie - This is awesome - our summer doesn't start until the end of June, but I'm definitely going to try this with Ivy and Oliver.
ReplyDelete